Dateiaustausch zwischen Laptop und CyanogenMod
01.10.2014
Ein guter Ansatz um ein Betriebssystem wie CyanogenMod zu erkunden ist das Dateisystem. Die externe SD-Karte läßt sich aus dem Smartphone entfernen und am Laptop über Micro-SD-Adapter beschreiben. Der interne Speicher ist aber meistens verlötet und läßt sich nur über zusätzliche Verbindungen auslesen (z.B. USB-Kabel).
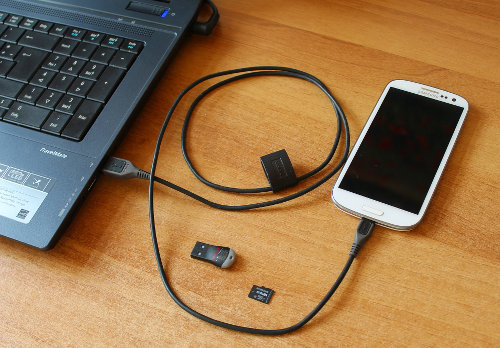
USB-Verbindung zwischen Laptop und Smartphone
Warnung
Die folgende Anleitung habe ich unter CyanogenMod Version 10.1.3. getestet. Es kann sein, dass Einstellungen oder Verzeichnisse in anderen CyanogenMod-Versionen nicht funktionieren !
Vorbereitung

Zum Dateiaustausch ist zunächst ein USB-Kabel zwischen Laptop und Smartphone notwendig. Auf dem Smartphone muss in den Einstellungen von CyanogenMod USB-Debugging eingeschaltet werden:
- Entwickleroptionen freischalten:
System - Über das Telefon - Build-Nummer - 7 x drauf tippen - USB-Debugging einschalten:
System - Entwickleroptionen - USB-Debugging - Häkchen setzen - Root-Zugriff für ADB einschalten:
System - Entwickleroptionen - Root-Zugriff - Apps & ADB
ADB installieren
Auf dem Laptop wird das Programm Android Debug Bridge (adb) benötigt. Da ich Linux benutze, lade ich mir adb für Linux herunter:
wget https://dl.google.com/android/repository/platform-tools_r19.0.1-linux.zip
# extract the zip and copy adb to your binaries
unzip platform-tools_r19.0.1-linux.zip
sudo cp ./platform-tools/adb /usr/bin/
# list all available cyanogenmod devices
adb devices
# example output
List of devices attached
8cef2da36d5c4f3b device
# log in to cyanogenmod via adb
adb shell
# if you rooted your phone you can switch to root user
su
SSH-Daemon im Smartphone konfigurieren
Als nächstes muss in CyanogenMod der SSH-Daemon konfiguriert werden. Meine Anleitung basiert auf der Dokumentationsseite von CyanogenMod:
https://web.archive.org/web/20161224202927/https://wiki.cyanogenmod.org/w/Doc:_sshd - meine Anleitung sollte allerdings etwas einfacher sein. Ich habe die Kommandos so umgeschrieben, dass sie vom Laptop aus per adb auch als Skript ausgeführt werden können. Einfach per copy-and-paste in die Kommandozeile einfügen.
# get ssh configuration files
wget https://www.torsten-traenkner.de/cyanogenmod/sshd_config
wget https://www.torsten-traenkner.de/cyanogenmod/99sshd
adb root
sleep 1
# create configuration directories
adb shell "mkdir -p /data/ssh/empty"
adb shell "chmod 700 /data/ssh;chmod 700 /data/ssh/empty"
adb shell "mkdir -p /data/.ssh;chmod 700 /data/.ssh"
# copy the public key to the authorized keys on cyanogenmod
adb push ~/.ssh/id_rsa.pub /data/.ssh/authorized_keys
adb shell "chmod 600 /data/.ssh/authorized_keys"
# create host keys in cyanogenmod
adb shell "ssh-keygen -t dsa -f /data/ssh/ssh_host_dsa_key -N \"\""
adb shell "chmod 600 /data/ssh/ssh_host_dsa_key"
adb shell "ssh-keygen -t rsa -f /data/ssh/ssh_host_rsa_key -N \"\""
adb shell "chmod 600 /data/ssh/ssh_host_rsa_key"
# copy sshd config
adb push sshd_config /data/ssh/sshd_config
adb shell "chmod 600 /data/ssh/sshd_config"
# auto start sshd
adb shell "mkdir -p /data/local/userinit.d"
adb push 99sshd /data/local/userinit.d/99sshd
adb shell "chmod 755 /data/local/userinit.d/99sshd"
# start sshd by hand
# adb shell "killall -9 sshd"
adb shell "/system/bin/sshd &"
# test ssh from laptop to smartphone with:
adb forward tcp:5022 tcp:22
ssh -p 5022 root@127.0.0.1
# 1. possible error:
# @ WARNING: REMOTE HOST IDENTIFICATION HAS CHANGED! @
# solution: delete the line in ~/.ssh/known_hosts - or the whole file
# 2. possible error:
# Agent admitted failure to sign using the key.
# solution: ssh-add
In sshd_config habe ich mit ListenAddress 127.0.0.1 den sshd aus Sicherheitsgründen so konfiguriert, dass sich niemand aus dem Internet mit dem SSH-Daemon auf dem Smartphone verbinden kann.
SSHFS installieren
Für das Programm sshfs (SSH Dateisystem) gibt es verschiedene Quellen. Ein Projekt auf Github stellt sshfs for Android als Quellcode zur Verfügung. Leider nicht als ausführbare Datei. Das Compilieren der Sourcen ist sehr aufwendig. Das Herunterladen der Build-Umgebung dauert bei 2 MB/s etwa 2 Stunden und benötigt mindestens 20 GB Speicherplatz. Eine Alternative ist das Debian Kit für Android mit vorkompilierten Programmen. Da das Debian Kit auch mindestens einige 100 MB groß ist, habe ich aus dem Debian-Kit nur sshfs mit den Programm-Bibliotheken und dem Linux-Loader herauskopiert:
# download sshfs binary and libraries
wget https://www.torsten-traenkner.de/cyanogenmod/sshfs.tgz
sha1sum sshfs.tgz
# 9d434463b0767bae12a69519f5e7da0b04046d85 sshfs.tgz
# copy to cyanogenmod
adb push sshfs.tgz /data/data/sshfs.tgz
adb root
sleep 1
# extract the binary and libraries
adb shell "mount -o remount,rw /system"
adb shell "cd /;tar xzvf /data/data/sshfs.tgz"
adb shell "rm -f /data/data/sshfs.tgz"
adb shell "mount -o remount,ro /system"
# enable sshfs
adb shell "/data/local/userinit.d/90loader"
Dateien austauschen
Die folgenden Kommandos können aufgerufen werden nachdem das Programm sshfs sowohl auf dem Laptop als auch auf dem Smartphone installiert wurde.
adb root
sleep 1
# (re)start sshd by hand
adb shell "killall -9 sshd"
adb shell "/system/bin/sshd &"
# forward the laptop port 5022 to port 22 on the smartphone:
adb forward tcp:5022 tcp:22
# on the laptop mount the smartphone file system under ~/mnt
mkdir ~/mnt
sshfs -p 5022 root@127.0.0.1:/ ~/mnt/
# the other way:
# reverse ssh from laptop to android smartphone
ssh -R 3022:localhost:22 -p 5022 root@127.0.0.1
# mount the laptop file system to the smartphone
mkdir /storage/sdcard1/mnt
sshfs -o allow_other user@127.0.0.1:/laptop/filesystem/ /storage/sdcard1/mnt -p 3022
# now you can access the laptop files
# under /storage/sdcard1/mnt on the smartphone
# after usage on the smartphone:
umount /storage/sdcard1/mnt
# after usage on the laptop:
fusermount -u ~/mnt
# or:
sudo umount ~/mnt
Die entstandenen SSH-Verbindungen werden in folgendem Bild dargestellt:
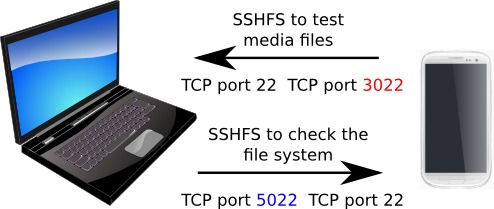
Normalerweise reicht es aus, dass sshfs nur auf dem Laptop aufgerufen wird. Die Rückrichtung mit reverse SSH vom Smartphone zum Laptop ist nicht zwingend notwendig. Die Rückrichtung ist dann von Vorteil, wenn zum Beispiel Mediendateien des Laptops auf dem Smartphone getestet werden sollen (z.B. Musik oder Videos). Dazu müssen also nicht die kompletten Mediendateien aufs Smartphone kopiert, sondern können per sshfs gestreamt werden.
Performance
Die Performance von "adb forward" für die Weiterleitung von Netzwerkpaketen zwischen Laptop und Smartphone ist eher gering. Mit USB-Tethering läuft die Datenübertragung etwas schneller. Hier sind meine nicht-repräsentativen Messungen:
- internes Schreiben auf meine Class 10 microSD-Karte: 15 MB/s
- vom Laptop aufs Smartphone schreiben mit adb forward: 5 MB/s
- vom Laptop aufs Smartphone schreiben über USB-Tethering: 9 MB/s
Wer USB-Tethering bevorzugt, kann meinen Artikel über USB-Tethering mit CyanogenMod lesen.
Checksummen berechnen
Um Veränderungen am Dateisystem zu erkennen helfen Prüfsummen der Dateien. Wurde eine Datei verändert, dann ändert sich auch die Prüfsumme. Im zweiten Schritt kann die Datei kopiert und anschließend nach einer Veränderung mit diff, vbindiff oder hexedit untersucht werden.
adb shell
# become root
su
mkdir /storage/sdcard1/filesystem/
# create a checksum file of the cyanogenmod file system
# this can take several minutes
find / -type f ! \( -path "/sys/*" -o -path "/proc/*" -o -path "/acct/*" -o -path "/storage/*" -o -path "/mnt/*" \) -exec sha1sum {} \; | sort -k 2 > /storage/sdcard1/filesystem/$(date +"%F_%H-%M-%S")_checksum.txt
# compress the /data directory for later analysis
tar czvf /storage/sdcard1/filesystem/$(date +"%F_%H-%M-%S")_data.tgz /data
# on the laptop you can compare two checksum files
kdiff3 ~/mnt/storage/sdcard1/filesystem/2014-10-01_20-00-00_checksum.txt ~/mnt/storage/sdcard1/filesystem/2014-10-01_20-05-00_checksum.txt
Bei den Veränderungen im Dateisystem ist mir aufgefallen, dass CyanogenMod mehr oder weniger anonymisierte Nutzungsstatistiken aufzeichnet. Zum Beispiel in der Datei: /data/system/usagestats/usage-20141001. Löschen geht mit "rm -f /data/system/usagestats/*". Außerdem werden in /data/system/dropbox/ Informationen zum (Neu)Start des Smartphones mit Uhrzeit hinterlegt. Wer abstürzende Apps debuggen möchte, sollte /data/system/dropbox/ nicht für Dateien sperren.
rm -f /data/system/usagestats/*
# and make the directory unwritable
chattr +i /data/system/usagestats/
# list attributes of the directory
lsattr -al /data/system/usagestats/
# you can do the same for the directories netstats, procstats and the dropbox
# these directories can contain personal data (usage information)
chattr +i /data/system/netstats/
chattr +i /data/system/procstats/
chattr +i /data/system/dropbox/
# to revert to the original mutable state use:
chattr -i /data/system/netstats/
Durch die Diff-Methode mit kdiff3 läßt sich auch herausfinden, wo CyanogenMod die Einstellungen speichert. Hier eine kleine Auswahl:
/data/data/com.android.inputmethod.latin/shared_prefs/com.android.inputmethod.latin_preferences.xml
/data/data/com.android.settings/shared_prefs/com.android.settings_preferences.xml
/data/data/com.cyanogenmod.lockclock/shared_prefs/LockClock.xml
/data/data/com.cyanogenmod.trebuchet/shared_prefs/com.cyanogenmod.trebuchet.prefs.xml
# see also settings.sh for details
Internen Speicher des Smartphones auslesen
Über das dd-Kommando kann der interne Speicher des Smartphones ausgelesen werden. Aus Neugier habe ich das ausprobiert. Der Erkenntnisgewinn ist unterm Strich allerdings gering.
dd if=/dev/block/mmcblk0 of=/storage/sdcard1/mnt/internal.img bs=100000
# on the laptop, inspect the image:
sudo apt-get install gdisk
gdisk -l internal.img
# output of gdisk
Number Start (sector) End (sector) Size Name
1 8192 16383 4.0 MiB BOTA0
2 16384 24575 4.0 MiB BOTA1
3 24576 65535 20.0 MiB EFS
4 65536 81919 8.0 MiB PARAM
5 81920 98303 8.0 MiB BOOT
6 98304 114687 8.0 MiB RECOVERY
7 114688 180223 32.0 MiB RADIO
8 180224 2277375 1024.0 MiB CACHE
9 2277376 5423103 1.5 GiB SYSTEM
10 5423104 6569983 560.0 MiB HIDDEN
11 6569984 6586367 8.0 MiB OTA
12 6586368 30769151 11.5 GiB USERDATA
# analysis of partitions:
Partition Name Content
1 BOTA0 empty
2 BOTA1 empty
3 EFS ext4 /efs
4 PARAM firmware for upload mode with boot logo
(LEAD Technologies)
5 BOOT gzipped kernel image and ramdisk?
6 RECOVERY the recovery.img 1:1
7 RADIO chip and modem firmware
8 CACHE ext4 /cache
9 SYSTEM ext4 /system
10 HIDDEN ext4 Samsung specific media files and apps
11 OTA empty
12 USERDATA ext4 /data
Das Programm "gdisk" listet die 12 Partitionen (Unterteilungen) des internen Speichers auf. Die eigentlich interessanten Partitionen sind die 9 und 12 mit den Programmen und Daten des Smartphones. Wer den Start-Bildschirm verändern möchte, kann das in Partition 4 /dev/block/mmcblk0p4. Dort liegt zum Beispiel die Bilddatei mit dem Start-Logo des Samsung Galaxy S3. In dieser Partition 4 sollten allerdings nur Profis Daten verändern, da das Smartphone bei Fehlbenutzung sonst nicht mehr startet.
Die Image-Datei kann unter Linux mit den folgenden Befehlen gemountet werden:
kpartx -a -v internal.img
mount /dev/mapper/loop0p12 /mnt/
# unmount everything
umount /mnt
kpartx -d -v internal.img
In den CyanogenMod-Einstellungen gibt es den Punkt "Telefon verschlüsseln". Dabei wird nur die Partition 12 /data verschlüsselt. Das sollte allerdings für die meisten Szenarien ausreichen, da hier die persönlichen Daten liegen. Vor einer gezielten Attacke auf die unverschlüsselte /system-Partition oder das Recovery-Image mit einem Trojaner schützt die verschlüsselte /data-Partition nicht.
Das war mein kleiner Artikel zum Dateiaustausch mit CyanogenMod. Viel Spaß beim Experimentieren !
Falls noch etwas unklar sein sollte, dann kannst du die Kommentar-Funktion benutzen.